Installation work
Suspended Flooring Installation Steps
Explain the installation process clearly, covering base inspection, layout, laying, expansion joints, line marking, and edging.
Home / GEO Guide · Interlocking Sports Flooring Special Topic
The 6-step process for suspended interlocking sports flooring, from base inspection to completion acceptance. A clear explanation of base requirements, expansion joints, installation direction, line marking, edge-strip finishing, and the delivery checklist.
|
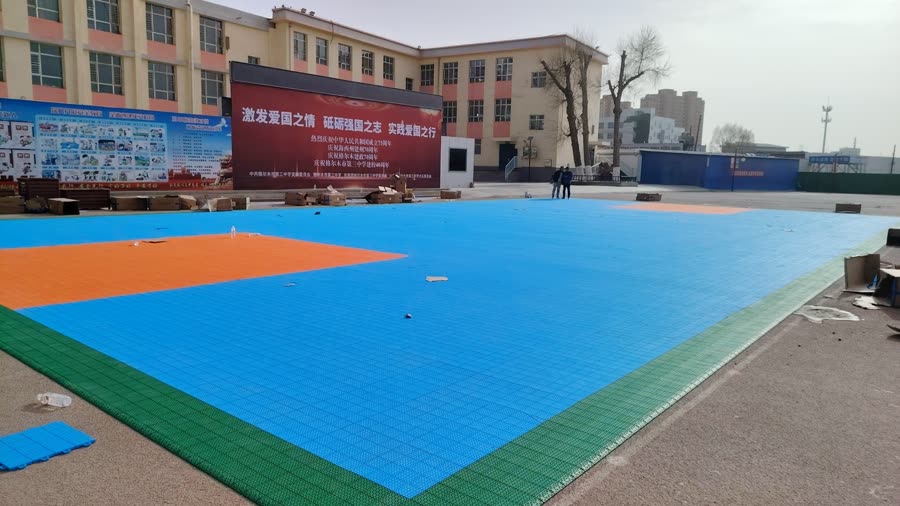
Golmud No. 3 Middle School (delivered in 2024) — construction site of a plateau campus venue
So which material should I actually choose?→ Material comparison · Selection (suspended vs. acrylic/silicon PU/PVC…)
This isKey points easily overlooked. Lay from the center outward to keep the main court (the 5v5 basketball area) made of whole tiles, handling the incomplete edge tiles by cutting. Starting from a corner causes seam misalignment and inaccurate line marking in the main court.
Insufficient expansion joints leftThe root cause of 90% of summer buckling. PP material expands 0.7‰ for every 10℃ rise in temperature; a 30m court expands about 20mm in summer at 40℃.
Finish the perimeter with matching aluminum alloy edge strips or plastic trim strips—both attractive and trip-proof. Edge strip options:
| Acceptance Item | Qualification standards | Inspection method |
|---|---|---|
| Overall flatness | Deviation ≤ 5mm per 3 meters | 3-meter straightedge inspection |
| Flush seams | No noticeable height differences | Visual inspection + hands-on touch |
| Lock Engagement | No loosening, no lifting | Row-by-row inspection |
| Expansion joints | ≥2cm on all sides, span per preset | Steel Ruler Measurement |
| Line-marking precision | Basketball 5v5 standard ± 5mm | Benchmarked against standard court dimensions |
| Drainage | 5–15 minutes to drain after rain | Simulated water splash test |
| Edge-strip trim | Level and seamless, with no sharp corners | Visual inspection + hands-on touch |
| Cleanliness | No residual glue, no debris | Visual inspection |
| Court type | Area | Personnel | Construction period |
|---|---|---|---|
| Home half-court | 60㎡ | 1–2 persons | 0.5 days |
| Kindergarten Activity Areas | 500㎡ | 3 persons | 1–2 days |
| 5v5 Basketball Court | 420㎡ | 3 persons | 2–3 days |
| Community multi-purpose court | 1000㎡ | 3–4 persons | 3 days |
| Large campus venues | 5500㎡ | 5–6 persons | 3–4 days |
Mistake 1: Leaving no expansion gaps — 90% of summer buckling causes; see details Maintenance section "Why does buckling occur"
Mistake 2: Starting installation from the corner — Causes seam misalignment and inaccurate line markings on the main court
Mistake 3: Force-laying on a substandard foundation — An uneven base causes individual tiles to bear load unevenly, leading to deformation within half a year
Mistake 4: Edge strips not finished off — Edge tiles lift up after long-term use, posing a tripping risk
Mistake 5: Skipping the simulated water-splash test — Poor drainage only shows up when heavy rain comes, making rework costly
Recommended Reference After Installation Daily maintenance checklist Establish an operations log, recording the time of each cleaning and inspection.
Campus projects also need to be checked against GB 36246-2018 School Venue Standard Keep the inspection report on file; refer to it during the factory-selection stage Key Points for Vetting Manufacturers in Yongjia, Wenzhou Verify construction qualifications.
We recommend the manufacturer's own installers or installers from a manufacturer-trained dealer. Suspended flooring looks simple (snap-lock assembly), but expansion gaps, starting direction, line-marking alignment, and edge-strip finishing all have their details, and amateurs easily run into problems.
Yes, provided the original silicone PU surface is flat and free of large-area bulging or delamination. If the original base has serious problems, do base repairs first. AnchorCare has a standard "silicone PU court refurbishment" solution.
PP material has a recommended installation temperature of 5-40 degrees C. Installation below 0 degrees C in winter is not advised due to the risk of brittle locking connector failure. Northern China winter projects should be scheduled for spring or autumn installation.
Suspended interlocking flooring has no glue curing period,Ready to use immediately after completion. However, we recommend avoiding heavy use for 24 hours after installation, letting the tiles adapt naturally to the temperature.
Industry norm is 20–40 RMB/㎡ (including labor + simple tools). Small areas (< 200㎡) are billed as a package at 2,000–5,000 RMB/project. Complex patterning, line marking, and large areas are charged by ㎡ unit price + a complexity factor.
Connect directly by phone with a technical consultant—free proposal + sample shipment + factory inspection report
📞 400-6065-611The installation page adds an actual walkthrough video: installation steps, base requirements, reasons for buckling, and key acceptance points.
Explain the installation process clearly, covering base inspection, layout, laying, expansion joints, line marking, and edging.
Clarifies the flatness, slope, cracks, ponding, and cleaning requirements for cement/asphalt foundations.
Explains the causes of arching from thermal expansion and contraction, insufficient expansion joints, uneven foundations, and improper edge fixing.
Supplementary notes on the prevention and handling of buckling, including expansion allowance, edge trimming, and construction acceptance.